Home
This is another chapter from my brief course of lectures on computer graphics. This time we are talking about the ray tracing. As usual, I try to avoid third-party libraries, as I believe that it makes students check what's happenning under the hood.
There are plenty of raytracing articles on the web; however the problem is that almost all of them show finished software that can be quite difficult to understand. Take, for example, the very famous businness card ray tracer challenge. It produces very impressive programs, but it's very difficult to understand how this works. Rather than showing that I can do renders, I want to tell you in detail how you can do it by yourself.
Note: It makes no sense just to look at my code, nor just to read this article with a cup of tea in hand. This article is designed for you to take up the keyboard and implement your own rendering engine. It will surely be better than mine. At the very least change the programming language!
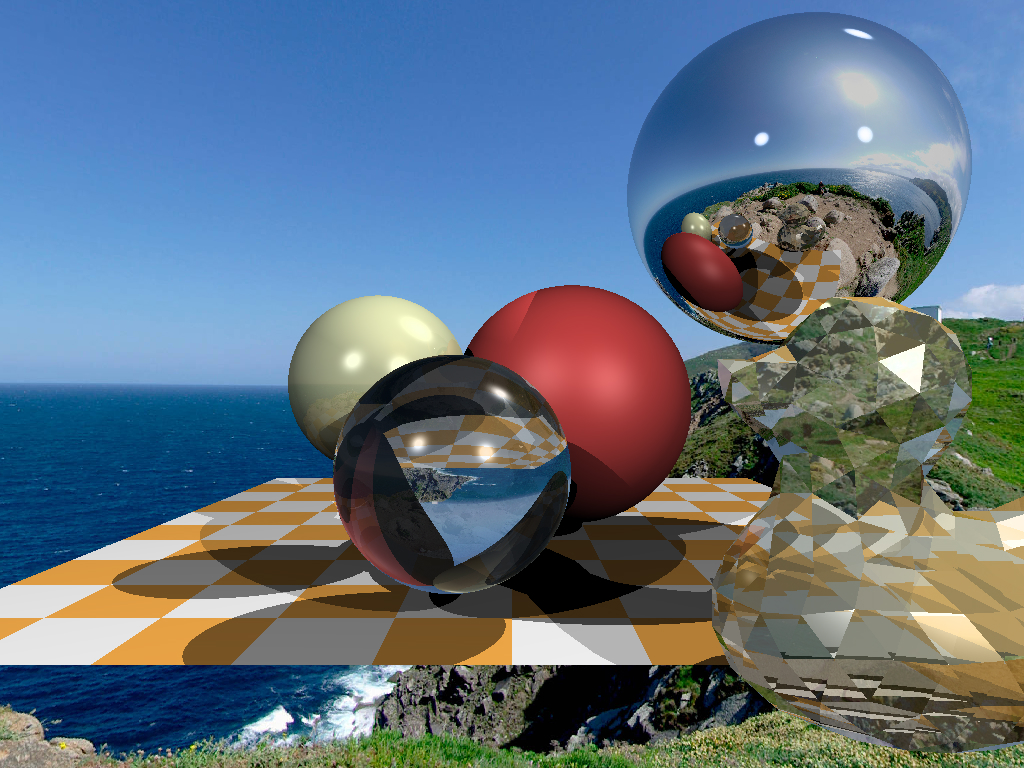
So, the goal for today is to learn how to render such images:
#include <limits>
#include <cmath>
#include <iostream>
#include <fstream>
#include <vector>
#include "geometry.h"

void render() {
    const int width    = 1024;
    const int height   = 768;
    std::vector<Vec3f> framebuffer(width*height);

    for (size_t j = 0; j<height; j++) {
        for (size_t i = 0; i<width; i++) {
            framebuffer[i+j*width] = Vec3f(j/float(height),i/float(width), 0);
        }
    }

    std::ofstream ofs; // save the framebuffer to file
    ofs.open("./out.ppm");
    ofs << "P6\n" << width << " " << height << "\n255\n";
    for (size_t i = 0; i < height*width; ++i) {
        for (size_t j = 0; j<3; j++) {
            ofs << (char)(255 * std::max(0.f, std::min(1.f, framebuffer[i][j])));
        }
    }
    ofs.close();
}

int main() {
    render();
    return 0;
}
Only render() is called in the main function and nothing else. What is inside the render() function? First of all, I define the framebuffer as a one-dimensional array of Vec3f values, those are simple three-dimensional vectors that give us (r,g,b) values for each pixel. The class of vectors lives in the file geometry.h, I will not describe it here: it is really a trivial manipulation of two and three-dimensional vectors (addition, subtraction, assignment, multiplication by a scalar, scalar product).
I save the image in the ppm format. It is the easiest way to save images, though not always the most convenient way to view them further. If you want to save in other formats, I recommend that you link a third-party library, such as stb. This is a great library: you just need to include one header file stb_image_write.h in the project, and it will allow you to save images in most popular formats.
So, the goal of this step is to make sure that we can a) create an image in memory + assign different colors and b) save the result to disk. Then you can view it in a third-party software. Here is the result:
 This is the most important and difficult step of the whole chain. I want to define one sphere in my code and draw it without being obsessed with materials or lighting. This is how our result should look like:

For the sake of convenience, I have one commit per step in my repository; Github makes it very easy to view the changes made. Here, for instance, what was changed by the second commit.
To begin with, what do we need to represent the sphere in the computer's memory? Four numbers are enough: a three-dimensional vector for the center of the sphere and a scalar describing the radius:
struct Sphere {
    Vec3f center;
    float radius;

    Sphere(const Vec3f &c, const float &r) : center(c), radius(r) {}

    bool ray_intersect(const Vec3f &orig, const Vec3f &dir, float &t0) const {
        Vec3f L = center - orig;
        float tca = L*dir;
        float d2 = L*L - tca*tca;
        if (d2 > radius*radius) return false;
        float thc = sqrtf(radius*radius - d2);
        t0       = tca - thc;
        float t1 = tca + thc;
        if (t0 < 0) t0 = t1;
        if (t0 < 0) return false;
        return true;
    }
};
The only non-trivial thing in this code is a function that allows you to check if a given ray (originating from orig in the direction of dir) intersects with our sphere. A detailed description of the algorithm for the ray-sphere intersection can be found here, I highly recommend you to do this and check my code.
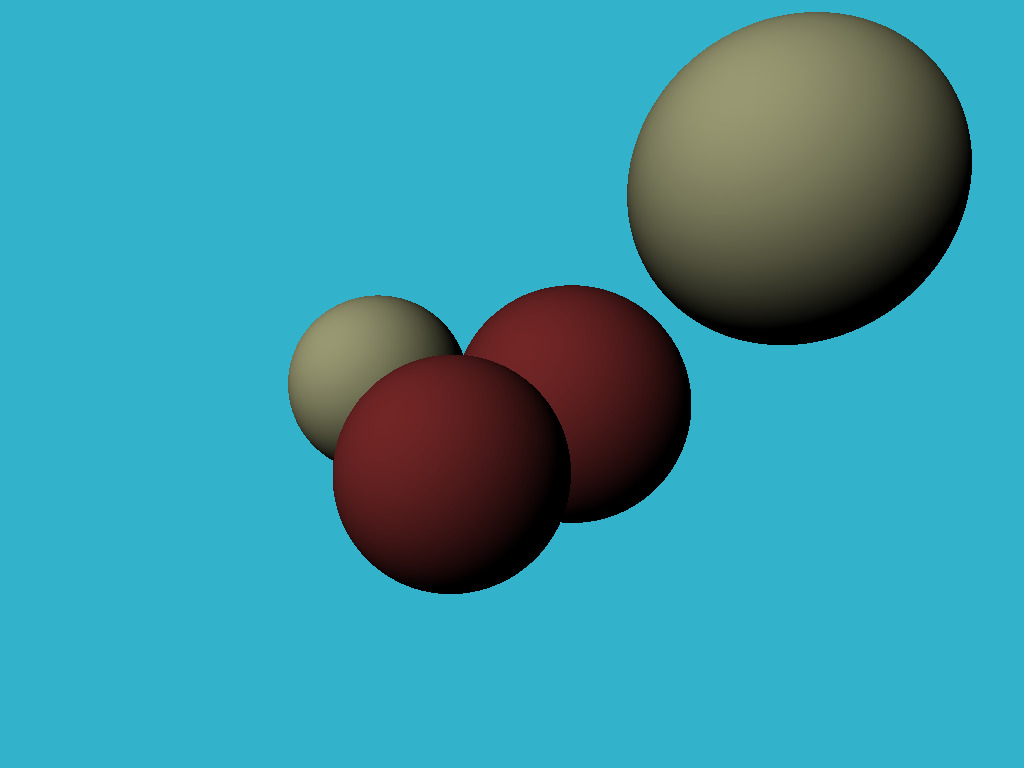
How does the ray tracing work? It is pretty simple. At the first step we just filled the picture with a gradient of colors:
    for (size_t j = 0; j<height; j++) {
        for (size_t i = 0; i<width; i++) {
            framebuffer[i+j*width] = Vec3f(j/float(height),i/float(width), 0);
        }
    }
Now for each pixel we will form a ray coming from the origin and passing through our pixel, and then check if this ray intersects with the sphere:

If there is no intersection with sphere we draw the pixel with color1, otherwise with color2:
Vec3f cast_ray(const Vec3f &orig, const Vec3f &dir, const Sphere &sphere) {
    float sphere_dist = std::numeric_limits<float>::max();
    if (!sphere.ray_intersect(orig, dir, sphere_dist)) {
        return Vec3f(0.2, 0.7, 0.8); // background color
    }
    return Vec3f(0.4, 0.4, 0.3);
}

void render(const Sphere &sphere) {
	[...]
    for (size_t j = 0; j<height; j++) {
        for (size_t i = 0; i<width; i++) {
            float x =  (2*(i + 0.5)/(float)width  - 1)*tan(fov/2.)*width/(float)height;
            float y = -(2*(j + 0.5)/(float)height - 1)*tan(fov/2.);
            Vec3f dir = Vec3f(x, y, -1).normalize();
            framebuffer[i+j*width] = cast_ray(Vec3f(0,0,0), dir, sphere);
        }
    }
	[...]
}
At this point, I recommend you to take a pencil and check on paper all the calculations (the ray-sphere intersection and the sweeping of the picture with the rays). Just in case, our camera is determined by the following things:
- picture width
- picture height
- field of view angle
- camera location, Vec3f(0.0.0)
- view direction, along the z-axis, in the direction of minus infinity
 The image is perfect in all aspects, except for the lack of light. Throughout the rest of the article we will talk about lighting. Let's add few point light sources:
```c++
struct Light {
Light(const Vec3f &p, const float &i) : position(p), intensity(i) {}
Vec3f position;
float intensity;
};
```
The image is perfect in all aspects, except for the lack of light. Throughout the rest of the article we will talk about lighting. Let's add few point light sources:
```c++
struct Light {
Light(const Vec3f &p, const float &i) : position(p), intensity(i) {}
Vec3f position;
float intensity;
};
```
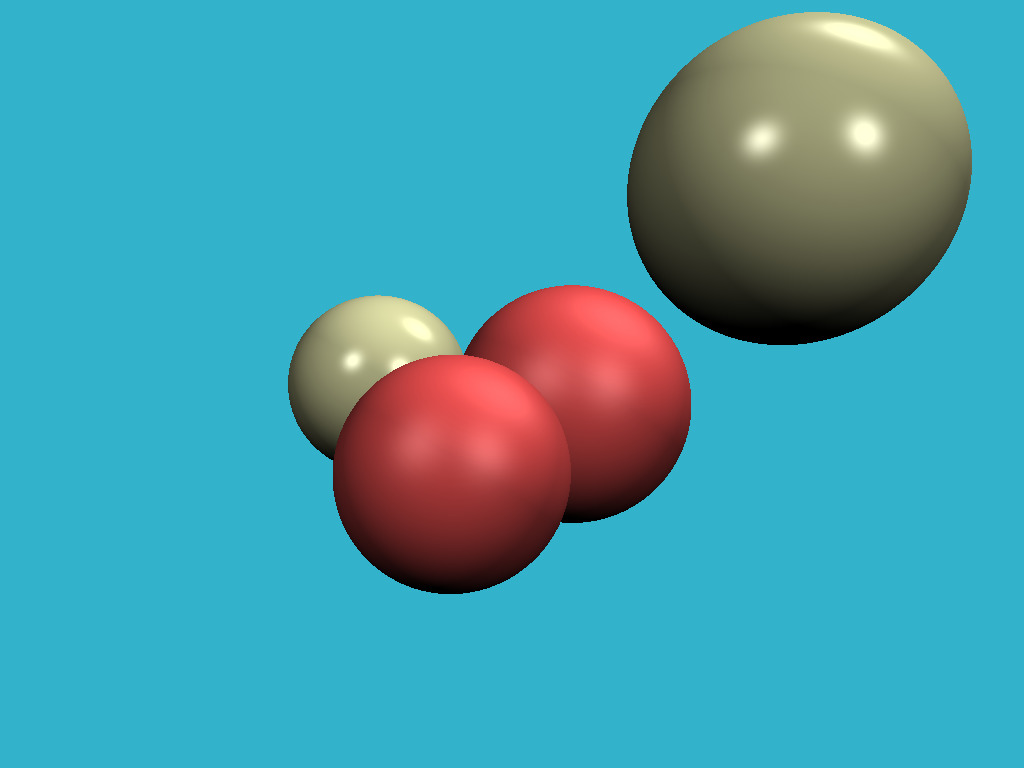
Computing real global illumination is a very, very difficult task, so like everyone else, we will trick the eye by drawing completely non-physical, but visually plausible results. To start with: why is it cold in winter and hot in summer? Because the heating of the Earth's surface depends on the angle of incidence of the Sun's rays. The higher the sun rises above the horizon, the brighter the surface is. Conversely, the lower it is above the horizon, the dimmer it is. And after the sun sets over the horizon, photons don't even reach us at all.
Back our spheres: we emit a ray from the camera (no relation to photons!) at it stops at a sphere. How do we know the intensity of the intersection point illumination? In fact, it suffices to check the angle between a normal vector in this point and the vector describing a direction of light. The smaller the angle, the better the surface is illuminated. Recall that the scalar product between two vectors a and b is equal to product of norms of vectors times the cosine of the angle between the vectors: a*b = |a| |b| cos(alpha(a,b)). If we take vectors of unit length, the dot product will give us the intensity of surface illumination.
Thus, in the cast_ray function, instead of a constant color we will return the color taking into account the light sources:
Vec3f cast_ray(const Vec3f &orig, const Vec3f &dir, const Sphere &sphere) {
    [...]
    float diffuse_light_intensity = 0;
    for (size_t i=0; i<lights.size(); i++) {
        Vec3f light_dir      = (lights[i].position - point).normalize();
        diffuse_light_intensity  += lights[i].intensity * std::max(0.f, light_dir*N);
    }
    return material.diffuse_color * diffuse_light_intensity;
}
The modifications w.r.t the previous step are available here, and here is the result:
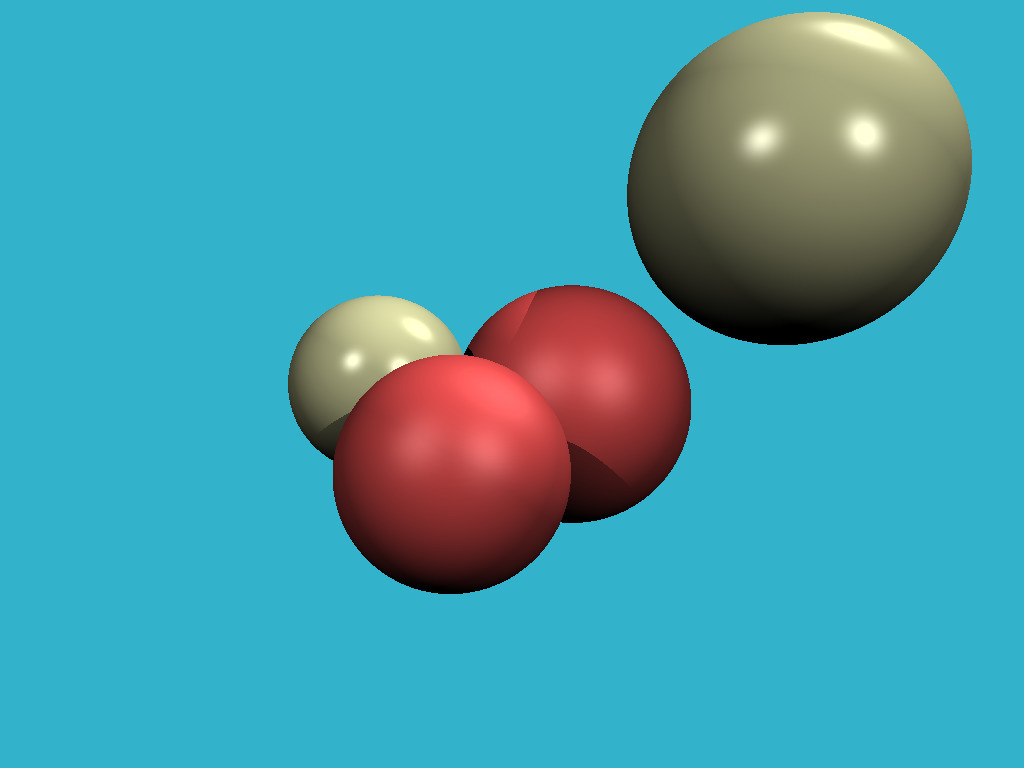
 The dot product trick gives a good approximation of the illumination of matt surfaces, in the literature it is called diffuse illumination. What should we do if we want to draw shiny surfaces? I want to get a picture like this:
Check how few modifications were necessary. In short, the brighter the light on the shiny surfaces, the less the angle between the view direction and the direction of reflected light.
This trickery with illumination of matt and shiny surfaces is known as Phong reflection model. The wiki has a fairly detailed description of this lighting model. It can be nice to read it side-by-side with the source code. Here is the key picture to understanding the magic:

Всего шесть строчек кода позволяют этого добиться: при отрисовке каждой точки мы просто убеждаемся, не пересекает ли луч точка-источник света объекты нашей сцены, и если пересекает, то пропускам текущий источник света. Тут есть только маленькая тонкость: я самую малость сдвигаю точку в направлении нормали:
Vec3f shadow_orig = light_dir*N < 0 ? point - N*1e-3 : point + N*1e-3;Почему? Да просто наша точка лежит на поверхности объекта, и (исключаяя вопрос численных погрешностей) любой луч из этой точки будет пересекать нашу сцену.
Это невероятно, но чтобы добавить отражения в нашу сцену, нам достаточно добавить только три строчки кода: Vec3f reflect_dir = reflect(dir, N).normalize();
Vec3f reflect_orig = reflect_dir*N < 0 ? point - N*1e-3 : point + N*1e-3; // offset the original point to avoid occlusion by the object itself
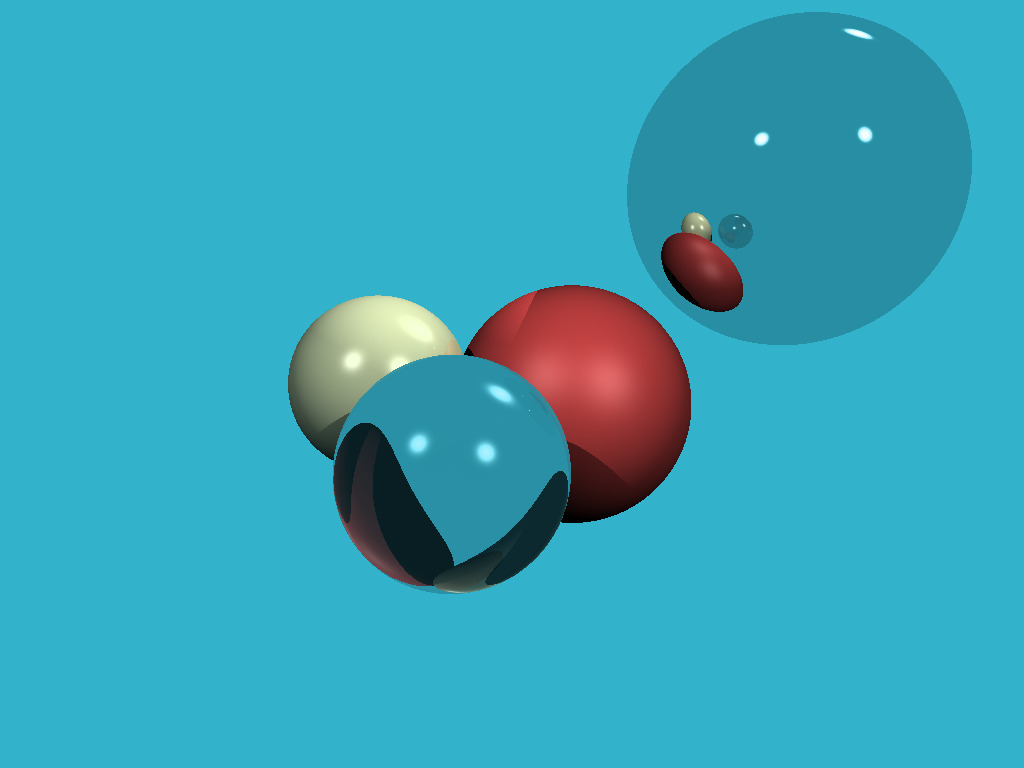
Vec3f reflect_color = cast_ray(reflect_orig, reflect_dir, spheres, lights, depth + 1);Убедитесь в этом сами: при пересечении с объектом мы просто считаем отражённый луч (функция из подсчёта отбесков пригодилась!) и рекурсивно вызываем функцию cast_ray в направлении отражённого луча. Обязательно поиграйте с глубиной рекурсии, я её поставил равной четырём, начните с нуля, что будет изменяться на картинке? Вот мой результат с работающим отражением и глубиной четыре:

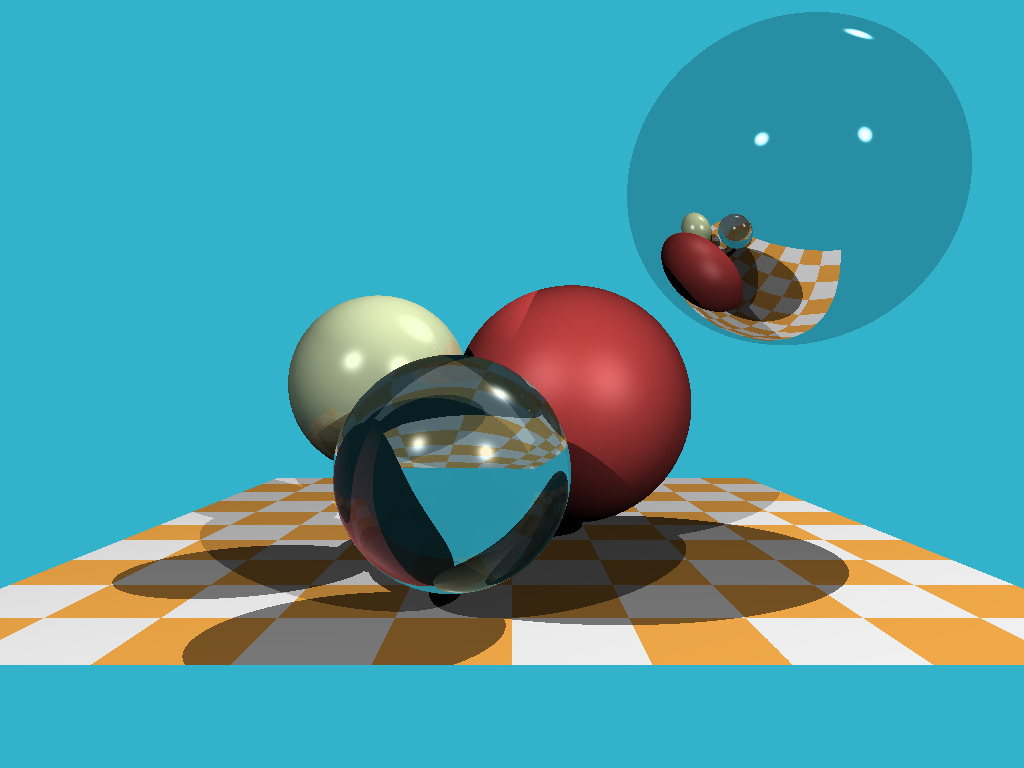
 А чего это мы всё без молока, да без молока. До этого момента мы рендерили только сферы, поскольку это один из простейших нетривиальных математических объектов. А давайте добавим кусок плоскости. Классикой жанра является шахматная доска. Для этого нам вполне достаточно десятка строчек в функции, которая считает пересечение луча со сценой.
Ну и вот результат:
Как я и обещал, ровно 256 строчек кода, посчитайте сами!
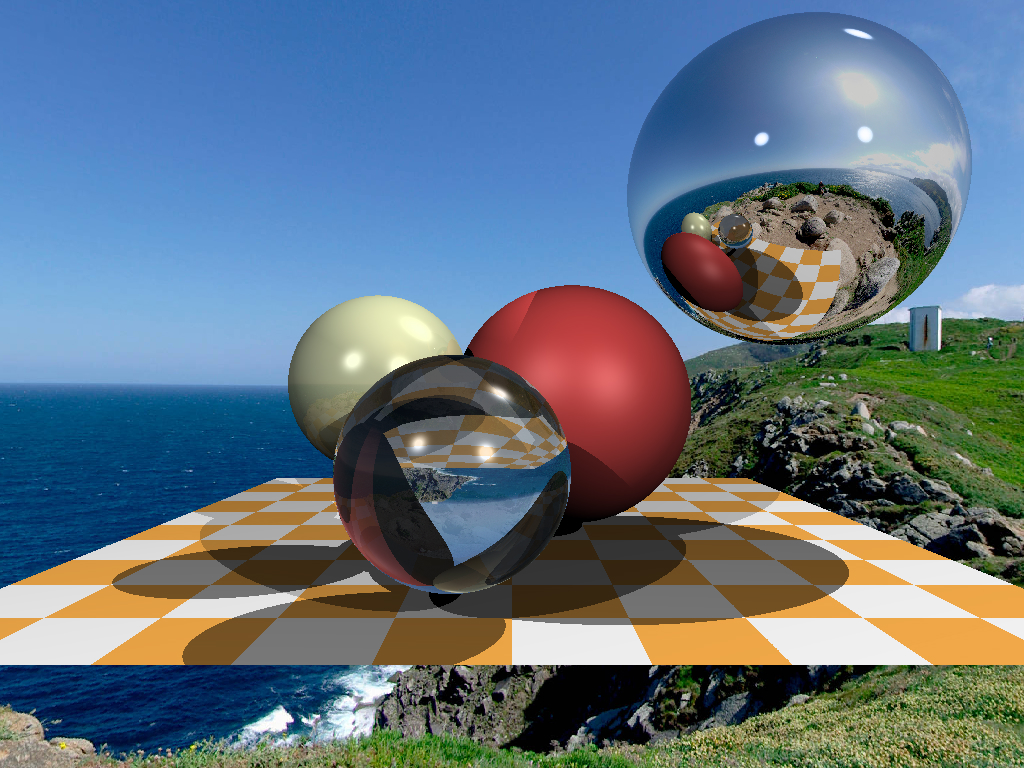
Мы прошли довольно долгий путь: научились добавлять объекты в сцену, считать довольно сложное освещение. Давайте я оставлю два задания в качестве домашки. Абсолютно вся подготовительная работа уже сделана в ветке homework_assignment. Каждое задание потребует максимум десять строчек кода. На данный момент, если луч не пересекает сцену, то мы ему просто ставим постоянный цвет. А почему, собственно, постоянный? Давайте возьмём сферическую фотографию (файл envmap.jpg) и используем её в качестве фона! Для облегчения жизни я слинковал наш проект с библиотекой stb для удобства работы со жпегами. Должен получиться вот такой рендер: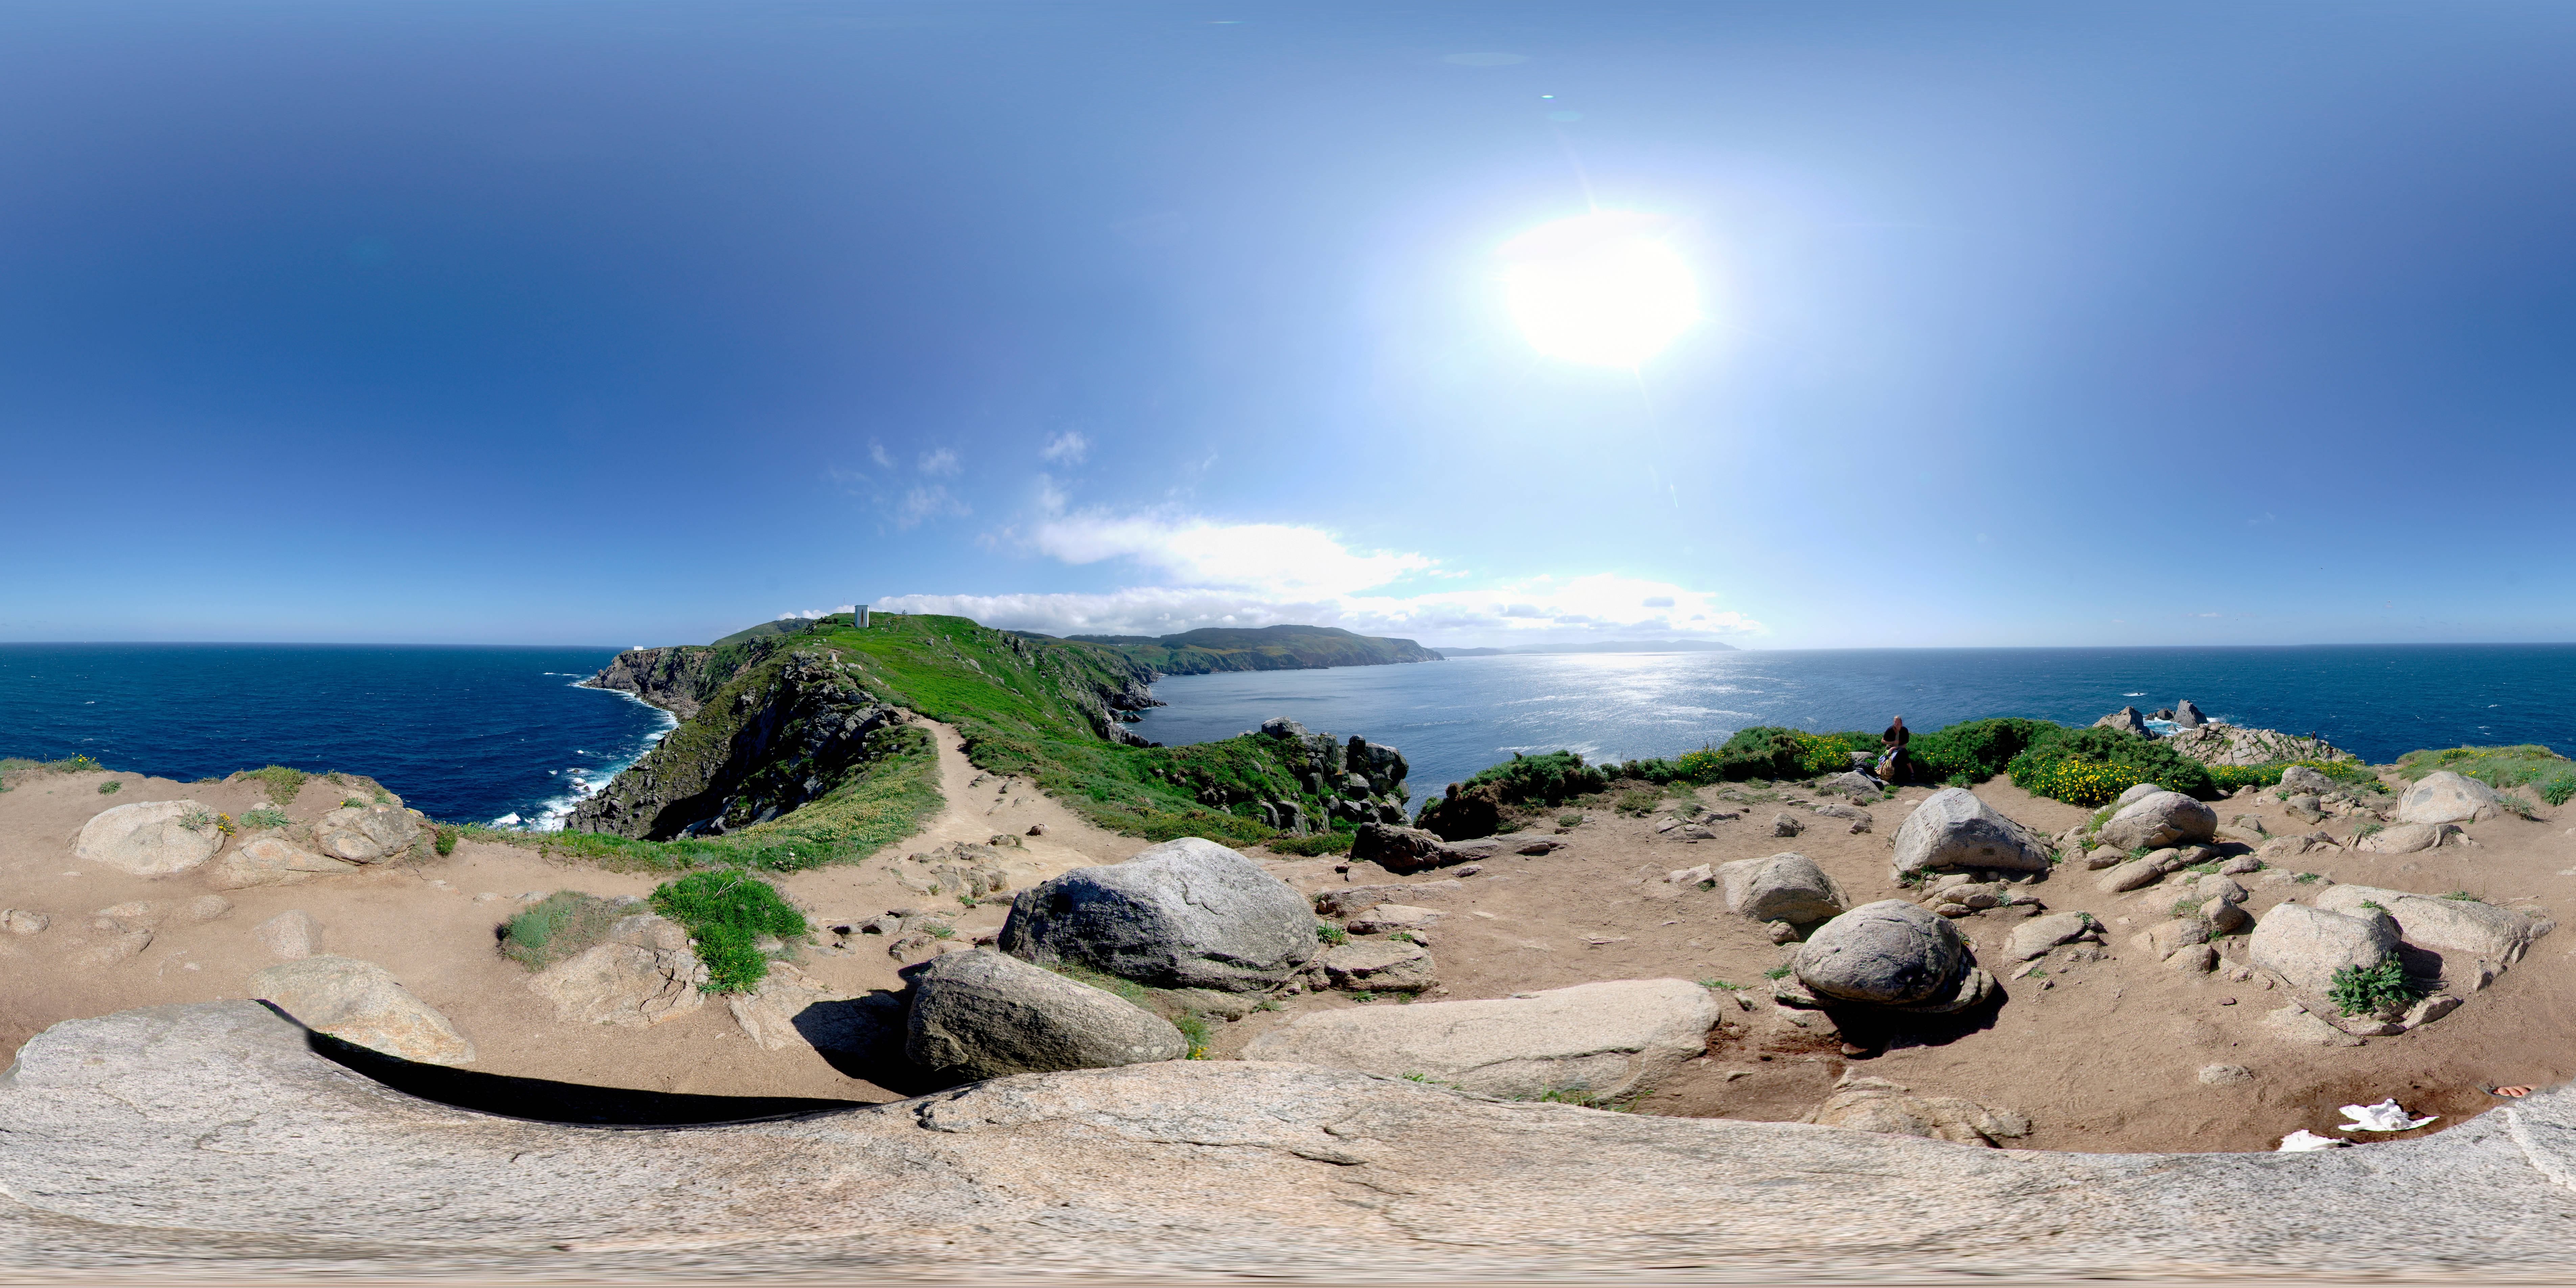
 Мы умеем рендерить и сферы, и плоскости (см. шахматную доску). Так давайте добавим отрисовку триангулированных моделей! Я написал код, позволяющий читать сетку треугольников, и добавил туда функцию пересечения луч-треугольник. Теперь добавить утёнка нашу сцену должно быть совсем тривиально!
Моя основная задача - показать проекты, которые интересно (и легко!) программировать, очень надеюсь, что у меня это получается. Это очень важно, так как я убеждён, что программист должен писать много и со вкусом. Не знаю как вам, но лично меня бухучёт и сапёр, при вполне сравнимой сложности кода, не привлекают совсем.
Мы умеем рендерить и сферы, и плоскости (см. шахматную доску). Так давайте добавим отрисовку триангулированных моделей! Я написал код, позволяющий читать сетку треугольников, и добавил туда функцию пересечения луч-треугольник. Теперь добавить утёнка нашу сцену должно быть совсем тривиально!
Моя основная задача - показать проекты, которые интересно (и легко!) программировать, очень надеюсь, что у меня это получается. Это очень важно, так как я убеждён, что программист должен писать много и со вкусом. Не знаю как вам, но лично меня бухучёт и сапёр, при вполне сравнимой сложности кода, не привлекают совсем.
Двести пятьдесят строчек рейтрейсинга реально написать за несколько часов. Пятьсот строчек софтверного растеризатора можно осилить за несколько дней. В следующий раз разберём по полочкам рейкастинг, и заодно я покажу простейшие игры, которые пишут мои студенты-первокурсники в рамках обучения программированию на С++. Stay tuned!