-
Notifications
You must be signed in to change notification settings - Fork 10
English

This plugin is made for the PC version of Rocket League, and needs BakkesMod to work. With it you can display your online MMR and stats on your previous matches (i.e. win, lose, current streak), whether in-game or in a streaming software (tested on OBS). Version 4 introduces themes and the ability to customize your own overlay, by using a JSON file.
Come join us on our Discord!
| 2 ways of downloading RocketStats | |
 |
|
| Download with BakkesMod | Download with GitHub |
⟹
⟹
Check out the menu on the right (or at the bottom of the page on mobile) to navigate through the different parts of this wiki.

Go to the BakkesMod page of the plugin by clicking on this link.
Click on the "Install with Bakkesmod" button. You may have a confirmation dialog that pops up, you can accept it.
A terminal should open to install the plugin. Follow the instructions on the terminal to complete installation.
If this is not working, you can try installing it directly from bakkesmod in you game. The ID code is 30.

On the main page of the project, click on the latest release in the side panel, or click on this link.
After that, click on the ZIP file to download it (the file should be named RocketStats v[...].zip and at the bottom of the page).

Open the BakkesMod folder by clicking on "Open BakkesMod folder" in the injector. Default path is
%appdata%/bakkesmod/bakkesmod
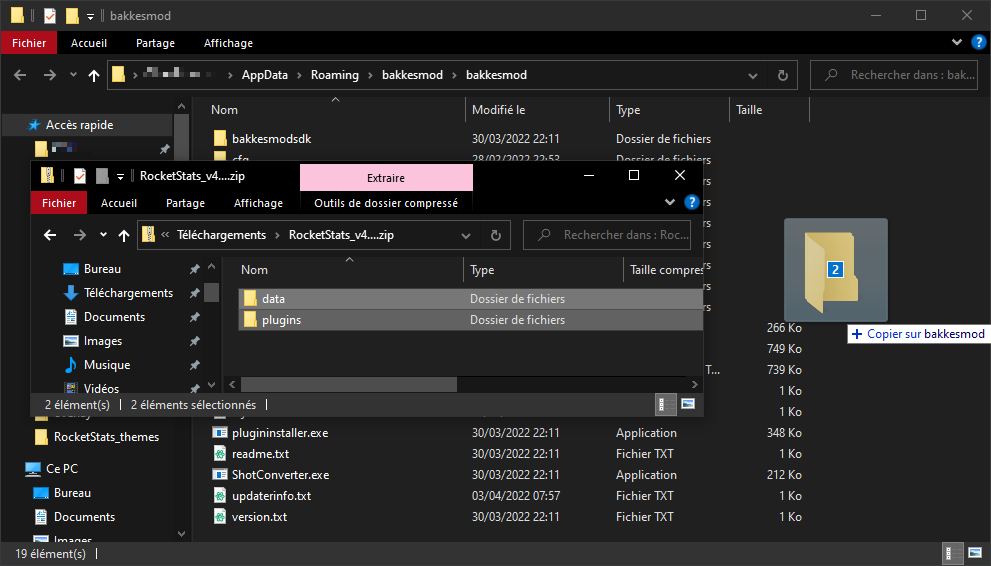
Extract the ZIP file downloaded from GitHub in that folder (you may have a prompt with folder conflicts, just accept them).
Note: Make sure that your game is closed or that RocketStats isn't already loaded in the BakkesMod plugin manager (in Rocket League: F2 > Plugins > Plugin Manager).
If you don't like the update and you want to go back to the previous version of the plugin, download it here and follow the installation procedure for GitHub.
The latest version allows advanced modifications of the theme displayed in game, so you can make these modifications by consulting the part relating to themes.
Note: Remember to remove the new version of the plugin by following the tutorial available here before installing this version (to avoid automatic updating).
To add hotkeys, you need to:
- Open the BakkesMod settings window by pressing "F2",
- Go to "Bindings",
- Click on "Add",
- Click on "None",
- Press the key on your keyboard that you want to bind,
- Double click on the first line of the list,
- Type the command that you want to bind to that key,
-
togglemenu rocketstats: hide IG overlay completely (with menu button), -
toggle cl_rocketstats_settings 0 1: hide RS menu only, -
toggle rs_toggle_logo 0 1; writeconfig: Hides menu logo, -
toggle rs_disp_overlay 0 1: Hides the overlay globally, -
toggle rs_enable_inmenu 0 1: Hides the overlay in the menus, -
toggle rs_enable_ingame 0 1: Hides the in-game overlay, -
toggle rs_enable_inscoreboard 0 1: Hides the overlay on the scoreboard.
-
- Click on both "Save" buttons.
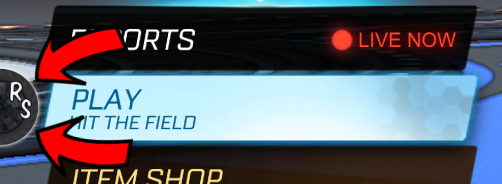
The menu is toggled using the RS logo visible on the left on the "Play" button. You can display it while in a match by entering the RL pause menu and pressing "Resume game".

- By ticking this box, you will enable output files. You can use these to integrate RS data into your stream by using a third-party software (i.g. OBS).
Note: Check theCapture third-party overlaysbox on the OBS game capture to make the RS overlay visible to your viewers, - Choose how do you want to display your stats,
- Session: Data will be zeroed when you start RL and the plugin is loaded,
- Gamemode: Same as "Session" but stats are separated between each mode,
- Always: Stores stats to be kept even if you close your game,
- Always Gamemode: Same as "Always" and "Gamemode" combined.
- Every themes are listed here, choose the one you want to display,
- Set the position, size, tilt and transparency of the theme.
By clicking on the buttons, you will enable the precise mode which you can use to set the associated value pixel-perfect.
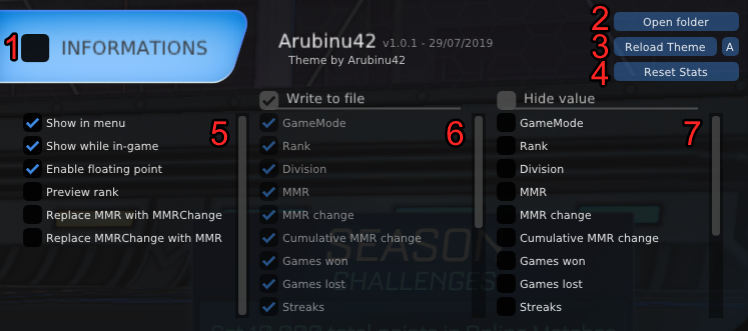
- Ticking this box will enable InGame overlay,
- Open RocketStats folder to manage installed themes and view OBS files,
- Reload current theme file from disk ("A" button reloads all themes to add or delete some),
- Reset all saved stats,
- Additional settings:
- Show in menu: Display overlay in a menu (when not in a match),
- Show in match: Display overlay in a match,
- Enable floating point: Display floating-point value instead of integers for the MMR, MMRChange and MMRChangeCumul,
- Preview rank: Display your current rank in ranked gamemodes,
- Conversion to roman numerals: Change "Diamond 1 Div. 2" to "Diamond I Div. II",
- MMR => MMRChange: Replace MMR data by MMRChange on the overlay without changing the config file,
- MMR => MMRCumulChange: Replace MMR data by MMRCumulChange on the overlay without changing the config file,
- MMRChange => MMR: Replace MMRChange data by MMR on the overlay without changing the config file,
- MMRChange => MMRCumulChange: Replace MMRChange data by MMRCumulChange on the overlay without changing the config file,
- MMRCumulChange => MMR: Replace MMRCumulChange data by MMR on the overlay without changing the config file,
- MMRCumulChange => MMRChange: Replace MMRCumulChange data by MMRChange on the overlay without changing the config file.
- Choose files to display while updating values (untick unused files to prevent overuse of your disk),
- Remplace values by "##" if you don't want to show it (useful for Twitch predictions).
We use OBS in this wiki but other similar software also works.
To display the overlay on OBS with a Game capture source, you need to check that the Capture third-party overlays is ticked.
You can also use the given files to create your own overlay directly into OBS.
Here is 2 examples of OBS overlays to get you started :
- RocketStats_overlay: Theme based on a Browser source
- Video by Rimey: Steps to use this overlay follows. Font used is Azonix Regular. Video by Rimey.

To add Rimey's video, you will have to download the video (linked above), add a "Media" source (select the downloaded video on your computer) and check the "Local file" box. If this isn't the case, tick the box to loop the video.
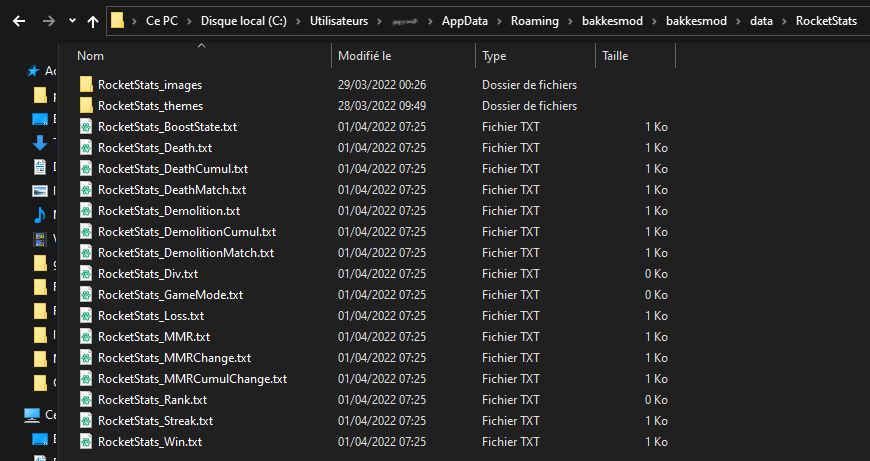
Now you need to add a "Text" source and tick the first box "Read from file" to select a RocketStats generated file. You can simply Drag and Drop the files from your explorer to your OBS scene to add them.
You can use the "Open folder" button in the RS menu to directly open the folder with all the available text files. Path should be "%appdata%\bakkesmod\bakkesmod\data\RocketStats" on Windows.
To change the pont of the text sources, search for "font" in the Windows search bar and open "Font settings". From there, you can drag and drop the font you want to use to install it. Restart OBS and select the newly installed font in your text sources.
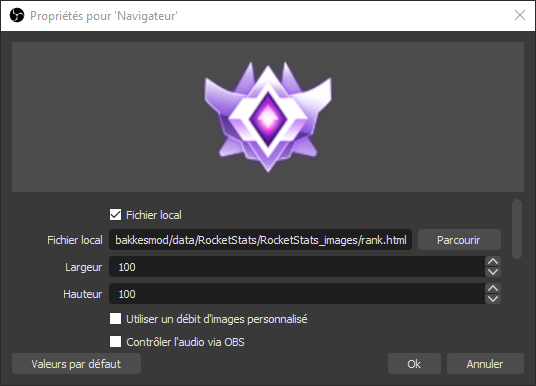
2 HTML files are available to use with a Browser source in OBS to display your rank and boost status (you can also drag & drop them just like Text sources). See above for location.
These HTML files will magically reload their content to match text files generated by the plugin.
Let's focus on themes, the newest feature of this plugin.
Themes are entirely customizable. To create one you have to use the JSON format (a structured text file).
We allowed 3 different types of elements that you can move freely on the screen:
- Texts (with variables),
- Shapes (i.g. rectangle, triangle, ...),
- Images (animation support coming soon).
You can add multiple themes to RocketStats right now:
- Go to this address by opening it in another tab: https://github.com/Arubinu/RocketStats_themes,
- Click on the green button "Code" then on "Download ZIP",
- From the RocketStats menu in Rocket League, click the "Open folder" button,
- Open the "RocketStats_themes" folder,
- Parallel open the previously downloaded ZIP,
- Take all the folders contained in the ZIP (such as Marker),
- Drag them into the "RocketStats_themes" folder.
To make themes appear in the menu list of RocketStats (if it is already launched), click on the "A" button and see the list of themes.
To create a theme, start by creating a folder in "RocketStats_themes". The name of that folder will be the name of the theme.
In that folder, create a file called "config.json" which will contain everything to render the overlay correctly.
Note: Make sure you can see the file extensions to prevent calling the file "config.json.txt" instead of "config.json".
Example tree of a theme:
(theme_name)/
├─── fonts/ (required if using custom fonts)
│    └─── Arial.ttf
├─── images/  (required if using images)
│    └─── background.png
├─── config.json (required)
└─── screenshot.png
Here is an example of a JSON theme file (config.json):
{
	"author": "Arubinu42",
	"version": "v1.0.0",
	"date": "07/29/2019",
	"x": 0.0,
	"y": 0.0,
	"width": 576,
	"height": 40,
	"font": ["myfont.ttf", 42],
	"scale": 1.0,
	"opacity": 1.0,
	"elements": []
}
Every numerical field can be modified in the RocketStats menu.
-
x: base position on the X axis (adjustable from the interface, in percentage from 0.0 to 1.0 or in calculation), -
y: base position on the Y axis (adjustable from the interface, in percentage from 0.0 to 1.0 or in calculation), -
width: overlay width (mandatory to use percentages), -
height: overlay height (mandatory to use percentages), -
font: if you want to use a specific font, format:[{name}, {size}], name is the font name in the "fonts" folder and size is the base font size (can be changed with the scale factor), -
fonts: now allows to use multiple fonts using the same format as font, format:[ [{name1}, {size1}], [{name2}, {size2}] ], -
scale[0 - 10 +/- 0.001]: base scale, -
rotate[-180 - 180 +/- 0.01]: base rotation, -
opacity[0 - 1 +/- 0.01]: alpha value (transparency, adjustable from the interface), -
elements: is a list that will contain every element in your theme (add a new line after this to separate the opening and closing brackets to add the elements to it and must be separated by a comma).
If you modify a basic theme (those provided and not the additional themes), an update will reset them.
To avoid this, rename the theme folder, which will make it a theme in its own right.
Each element is made up of several parameters:
-
visible[true|false]: element will be displayed, -
name: may be used in future versions (so specify it as a precaution), -
font: the name of the font to use (if it is not the one chosen by default), -
value: text parameter, can include variables, -
align[left|center|right]: horizontal alignment, -
valign[top|middle|bottom]: vertical alignment, -
color[red, green, blue[, alpha]]: alpha channel is a percentage between 0.0 and 1.0, -
fill: fill color of a shape (same format as "color"), -
stroke: outline color of a shape (same format as "color", it is centered so protrudes outside as well as inside depending on the thickness), -
rotate[-180 - 180 +/- 0.01]: rotation of the element (in degrees), -
opacity[0 - 1 +/- 0.01]: global opacity of the element, but also of each color, -
transform[upper|lower|capitalize]: text transformation.-
upper: convert to uppercase, -
lower: convert to lowercase, -
capitalize: 1st letter uppercase for every word, rest is lowercase.
-
To use variables in text elements, you need to enclose the variable name with double curly brackets (i.g. for mmr variable: "MMR: {{MMR}}" will display MMR: 1000 if you have 1000 MMR)
Available variables:
- General:
-
Games: the number of games played, -
GameMode: current gamemode (Duel, Chaos, ...), -
Rank: current rank (Gold III, Champion II, etc), -
RankName: only the rank name, -
RankNumber: only the rank number, -
Div: current rank division (Div. 4, Div. 1), -
DivName: only the division label (Div.), -
DivNumber: only the division number, -
MMR: MMR in current gamemode, -
MMRChange: last change in your MMR (delta for 1 match), -
MMRCumulChange: total change in your MMR (delta for whole session), -
Win: number of matches won, -
Loss: number of matches lost, -
Streak: current streak, -
WinRatio: the difference between games won and games lost, -
WinPercentage:WinRatiobut in percent.
-
- Shots:
-
Clear: hit the ball away from your goal, -
Assist: pass the ball to a teammate who scores, -
Center: hit the ball towards the center of the field near the opposing goal, -
AerialHit: hit the ball while in the air (above crossbar), -
BicycleHit: hit the ball by back-flipping into it, -
ShotOnGoal: hit the ball towards the opponent team's net.
-
- Saves:
-
Save: block a shot from going in your net, -
EpicSave: block a shot on goal that's on the verge of scoring.
-
- Goal:
-
Goal: hit the ball into the opponent's net, -
OwnGoal: score a goal into your own net, -
LongGoal: score a goal from a great distance (past half-field), -
PoolShot: score a goal by hitting an opponent into the ball, -
AerialGoal: score a goal with an aerial hit, -
TurtleGoal: score a goal by hitting the ball while upside-down, -
BicycleGoal: score a goal with aBicycleHit, -
OvertimeGoal: score a goal in the overtime, -
BackwardsGoal: score a goal by hitting the ball with the back of your car, -
HoopsSwishGoal: in Hoops, score a goal without the ball hitting anything on the way in (no ceiling + no walls + no ring),
-
- Dropshot:
-
BreakoutDamage: hit a tile with the ball in its first or second phase, -
BreakoutDamageLarge: hit a tile with the ball in its third or final phase.
-
- Knockout:
-
KnockoutKO: Kill someone, -
KnockoutDoubleKO: Kill 2 players in a row, -
KnockoutTripleKO: Kill 3 players in a row, -
KnockoutDeath: Get killed by someone, -
KnockoutAssist: Help to kill someone, -
KnockoutGrabbed: How many times have you been grabbed by someone, -
KnockoutThrown: How many times you've been thrown by someone, -
KnockoutWinner: How many times you've won a KO match, -
KnockoutLightHit: Hit someone while not being at supersonic speed, -
KnockoutHeavyHit: Hit someone while being at supersonic speed, -
KnockoutHitTaken: Being hit by someone, -
KnockoutBlockTaken: Being blocked by someone, -
KnockoutLightBlock: Block someone while they aren't at supersonic speed, -
KnockoutHeavyBlock: Block someone while they are at supersonic speed, -
KnockoutPlayerThrown: Throw someone, -
KnockoutPlayerGrabbed: Grab someone, -
KnockoutAerialLightHit: Hit someone while airborne while not being at supersonic speed, -
KnockoutAerialHeavyHit: Hit someone while airborne while being at supersonic speed
-
- Miscs:
-
FirstTouch: be the first to touch the ball on kickoff, -
Demolitions: demolish another player, -
Death: get demolished by another player, -
HatTrick: score 3 goals in a single game, -
Savior: save 3 shots in a single game, -
Playmaker: assist 3 goals in a single game, -
LowFive: give a congratulatory bump to your team's goal-scorer after the goal, -
HighFive: give a high-flying congratulatory bump to your team's goal-scorer after the goal,
-
- Accolades:
-
MVP: earn the highest score in a match (you must be on the winning team), -
CarTouches: Count how many times you received the accolade, -
FastestGoal: Granted if you're the one with the highest goal speed, -
SlowestGoal: Granted if you're the one with the lowest goal speed, -
BoostPickups: Count how many times you received the accolade, -
FurthestGoal: Granted if you're the one that scored from the farthest, -
MostBallTouches: Granted if you're the one with the most ball touches, -
MostBoostPickups: Granted if you're the one with the most boost pads picked up,, -
FewestBallTouches: Granted if you're the one with the least amount of boost pad picked up.
-
Some of these variables have a Match version and a Cumul version (such as DemolitionsMatch and DemolitionsCumul), knowing that the normal version is linked to the mode chosen in the menu.
For the normal versions and those mentioned above, there is a Team version and a Total version (such as TeamDemolitionsMatch and TeamDemolitionsCumul).
Here are the details of its releases:
-
Match: only converts the statistics of the current game (is therefore reset at the start of the next game), -
Cumulation: gathers the statistics of all the game modes (is therefore not influenced by the mode chosen in the menu), -
Team: identifies the statistics of your team, -
Total: gathers the statistics of your whole team (including you).
Text element example:
{
	"name": "mmr",
	"type": "text",
	"value": "My MMR: {{MMR}}",
	"x": 170,
	"y": 20,
	"align": "right",
	"valign": "middle",
	"color": [255, 255, 255],
	"scale": 1.2
}Images are loaded from the "images" folder in the theme folder:
{
	"name":			"background",
	"type":			"image",
	"file":			"background.png",
	"x":			0,
	"y":			0,
	"rotate":		45.0,
	"scale":		1.5
}
You can also specify the "{{Rank}}" value for the "file" parameter which will be replaced by the rank icon
{
	"name":			"rank",
	"type":			"image",
	"file":			"{{Rank}}",
	"x":			27,
	"y":			20,
	"align":		"center",
	"valign":		"middle",
	"scale":		0.85
}
Note that you can change the image color with the "color" parameter.
To create a line, you need to specify the start point and the end point.
The "x1" and "y1" coordinates specify the start point and the "x2" and "y2" coordinates specify the end point.
{
	"name":			"separator1",
	"type":			"line",
	"x1":			"170px + 13px",
	"y1":			8,
	"x2":			"170px + 13px",
	"y2":			"100% - 8px",
	"color":		[ 255, 0, 0, 0.1 ],
	"scale":		2.5
}Just like lines, triangles need points to be drawn, but 3 instead of only 2.
{
	"name":			"right_triangle",
	"type":			"triangle",
	"x1":			"100%",
	"y1":			0,
	"x2":			"100% + 40px",
	"y2":			0,
	"x3":			"100%",
	"y3":			"100%",
	"fill":			[ 0, 0, 0, 0.82 ],
	"stroke":		false
}In this example, the recatngle will fit the whole screen specified for that theme. The "rounding" parameter rounds the corners of the rectangle.
{
	"name":			"box",
	"type":			"rectangle",
	"x":			0,
	"y":			0,
	"width":		"100%",
	"height":		"100%",
	"rounding":		5,
	"fill":			false,
	"stroke":		[ 127, 127, 127, 0.5 ]
}Circles are a bit particular because they have segments, which can allow you to make an octogone for example. The "position" paramteter refers to the center of the circle.
{
	"name":			"box",
	"type":			"rectangle",
	"x":			0,
	"y":			0,
	"radius":		20,
	"segments":		12,
	"fill":			[ 127, 127, 127, 0.5 ],
	"stroke":		[ 255, 0, 0, 1.0 ]
}
Pie charts allows you to create an unfinished circle at a specified angle in degrees (angle-min et angle-max). The other parameters are the same as for the circle.
{
	"name":			"quart",
	"type":			"pie_chart",
	"x":			0,
	"y":			"50%",
	"angle-min":	45,
	"angle-max":	180,
	"radius":		50,
	"segments":		32,
	"fill":			[ 255, 0, 0, 0.5 ],
	"stroke":		[ 0, 255, 0, 1.0 ]
}There are some other parameters which can be used in some cases:
-
sign: takes as a value the name of a variable (without the curly brackets) and allows you to add the positive sign on the specified variable. -
chameleon: same as "sign", this one will go from green to red if the variable is positive or negative.
30
Check the right column in the RS menu and uncheck the top box "Hide value"
If you installed the plugin manually, you'll have to enable it before you can use it. F2 > Plugins > Plugin manager (beta) > Open > rocketstats.dll > Check box
After a manual installation, your game may crash once, that's a known issue. Just restart your game and you'll be good to go!
- Make sure RS is disabled in bakkesmod (F2 > Plugins > Plugin manager (beta) > Open > RocketStats > Uncheck box)
- Delete all these folders and files
| Path (relative to bakkesmod folder) | Description |
|---|---|
| data\RocketStats\ | stored overlays and assets |
| data\rocketstats.json | recorded session stats |
| plugins\RocketStats.dll | plugin dll |
| plugins\settings\RocketStats.set | plugin config window |