-
Notifications
You must be signed in to change notification settings - Fork 30
Getting started with the StyleCop activity
The StyleCop activity allows you to run StyleCop as part of your of build process. StyleCop scans .CS files against a set of rules defined in the .StyleCop settings file. As this activity runs against source files it can be run before or after building the projects in a build workflow. In this example we aim to show the the basic steps that are required to get the activity integrated into a build.
Before you can make use of any of the TFS community build activities you have to make sure they are available for the build system and on your development PC. Instructions for this process can be found in the ALM Rangers build guide or in the getting started section of this wiki. This page assumes the StyleCop activity is available in the developers build process workflow toolbox.
- Download and install StyleCop on you development PC. The custom activity is built against StyleCop 4.7.x.x.
- Download and unzip the Community TFS Build Extensions to a directory on you development PC. The zip file contains both 2010 and 2012 version of the custom activities.
The assemblies that contain the custom activity and StyleCop need to put under source control so they are available to the build controller and agent(s).
- In VS2010 or VS2012 open Source Control Explorer select your Team Project and map the BuildProcessTemplates folder to a location on your local disk.
- Create a new folder under the BuildProcessTemplates called Custom Assemblies
- In this Custom Assemblies new folder copy all the assemblies from the unzipped TFS Build Extensions Make sure you copy the 2010 or 2012 version of the assemblies as required.
- Also copy all the StyleCop DLL from C:\Program Files (x86)\StyleCop 4.7 to Custom Assemblies
- From within Source Control Explorer add these new files to the new Custom Assemblies folder and check the files into TFS.
- Open Team Explorer, right-click on Builds and select Manage Build Controllers
- Select the controller to configure, and then select Properties
- Set the Version control path to custom assemblies to the location just created under version control containing your added assemblies
We can now start to edit the process template mapped in the previous step to add our custom activities.
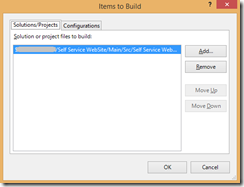
Previously this documentation detailed a process where the StyleCop settings, the rules to test against, were loaded from the same folder as the solution or project being built and applied to all the .CS files under this folder. This meant that if you wanted different settings files for different projects in a solution you had to build each project separately, a different row in the’ Item to Build’ dialog of the build process

This works fine for some teams, but does mean that you cannot just build the solution files and have different StyleCop settings files used for each project without manually managing what is build and in what order.
This documentation now also contains an alternative way for using the StyleCop activity that does not have this limitation
In this version we find the StyleCop settings file in teh same foilder as the .SLN or .CSPROj file and then use it to test all the .CS files below it in the folder structure.
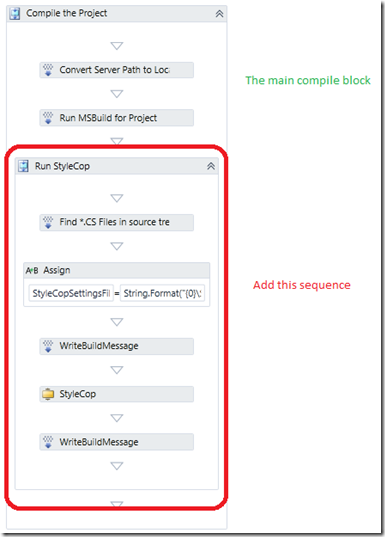
In this example we are Using the DefaultTemplate, find the ‘Compile the Project’ sequence and add the activities as show in a graphic below. We have chosen to add the sequence inside the compile phase of the project so we can pickup the solution file’s location, but you could choose a different location if that better meets you needs. The StyleCop activity does not require to be after the compile stage as it works against the .CS files, not the compiled assemblies.

To add this block of activities:
- Add a new sequence activity, named it “Run StyleCop”
- Add the following variable with a scope of the “Run StyleCop” sequence StyleCopFiles – iEmumerable
- StyleCopSettingsFile – string
- StyleCopResults – bool
- StyleCopViolations - int32
- The choice of the paths to use depend on whether you wish to use the same StyleCop rules for all projects in a solution. In many project the number of StyleCop rules for the production code will be higher than for test code e.g. no XML headers for unit tests.
If you wish to use the same rules for all files in a solution
- Make sure the build builds the SLN file
- Make sure there is a settings.stylecop file in the same folder as the solution file (else the default will be used)
- Add a FindMatchingFile activity, set the result to StyleCopFiles and the MatchPattern to String.Format("{0}***.cs", BuildDirectory). This will recursively find all the .CS files in the project and add them to the collection.
- Add an Assign activity, this is set the to property to StyleCopSettingsFile and the value to String.Format("{0}\Settings.StyleCop", localProject.Substring(0, localProject.LastIndexOf(""))). We use the name of the .SLN file to find the root folder to find the StyleCop solutions settings file.
If you wish to use different rules for each project in a solution
-
Make sure the build builds the PROJ files one by one
-
In each project folder have a settings.stylecop file with the correct rules. TIP: Make sure the rules are set to not merge in values from parent folders as this will usually mean you enable more rules than you expect.
-
Add a FindMatchingFile activity, set the result to StyleCopFiles and the MatchPattern to String.Format("{0}***.cs", localProject.Substring(0, localProject.LastIndexOf(""))). This will recursively find all the .CS files in the project and add them to the collection.
-
Add an Assign activity, this is set the to property to StyleCopSettingsFile and the value to String.Format("{0}\Settings.StyleCop", localProject.Substring(0, localProject.LastIndexOf(""))). We use the name of the .SLN file to find the root folder to find the StyleCop projects settings file.
-
Add a WriteBuildMessage activity, set the importance to High (so we always see the message) and the Message to String.Format("About to run Stylecop with {0}", StyleCopSettingsFile)
-
Add a StyleCop activity with the following properties (these are a minimum to get it working, to see what the other options do we would suggest you look at the unit tests in the Codeplex activities source.)
- SettingsFile = StyleCopSettingsFile
- SourceFiles = StyleCopFiles.ToArray()
- Succeeded = StyleCopResults
- TreatViolationsErrorASWarnings = True - setting this is down to how you want violations to appear in the log
- ViolationCount = StyleCopViolations
-
Add another WriteBuildMessage activity, again set the importance to High and the Message to String.Format("StyleCop Successed:{0} with {1} violations", StyleCopResults, StyleCopViolations)
-
Save the edited process template and check it into TFS
In this version we find each StyleCop settings files then use it to test all the .CS files below it in the folder structure. This process is repeated for all discovered settings files
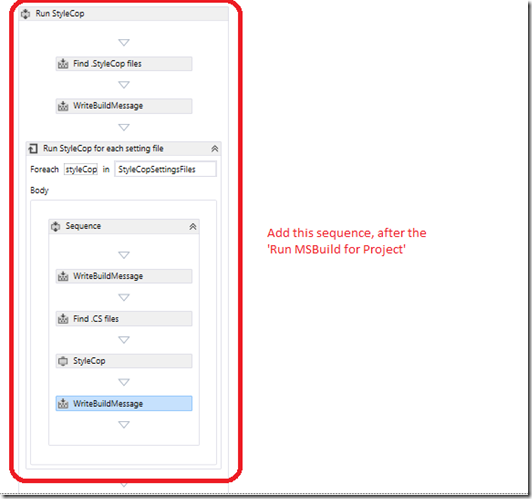
In this example we are Using the DefaultTemplate, find the ‘Compile the Project’ sequence and add the activities as show in a graphic below the ‘Run MSBuild for Project’. We have chosen to add the sequence inside the compile phase of the project so we can pickup the solution file’s location, but you could choose a different location if that better meets you needs. The StyleCop activity does not require to be after the compile stage as it works against the .CS files, not the compiled assemblies.

To add this block of activities:
-
Add a new sequence activity, named it “Run StyleCop”
-
Add the following variable with a scope of the “Run StyleCop” sequence StyleCopFiles – iEmumerable
- StyleCopSettingsFiles – iEmumerable
- StyleCopResults – bool
- StyleCopViolations - int32
-
The difference with this model is that we search for the StyleCop settings files thus allow different StyleCop rules for the production code and test code e.g. no XML headers for unit tests.
- Make sure the build builds the SLN file
- In each project folder under the solution folder have a settings.stylecop file with the correct rules. TIP: Make sure the rules are set to not merge in values from parent folders as this will usually mean you enable more rules than you expect.
-
Add a FindMatchingFile activity, set the result to StyleCopSettingsFiles and the MatchPattern to String.Format("{0}***.stylecop", localProject.Substring(0, localProject.LastIndexOf(""))). This will recursively find all the StyleCop settings files in the project and add them to the collection.
-
Add a WriteBuildMessage activity, set the importance to High (so we always see the message) and the Message to String.Format("Found {0} Stylecop settings files in our under {1}", StyleCopSettingsFiles.Count(), localProject.Substring(0, localProject.LastIndexOf("")))
-
Add a Foreach block, this is set to iterate over the StyleCopSettingsFiles collection returning a local file path a styleCopSettingsFile
-
Add a Sequence block
-
Inside the sequence add WriteBuildMessage activity, set the importance to High (so we always see the message) and the Message to String.Format("Running Stylecop for settings file {0}", styleCopSettingsFile)
-
Inside the sequence add a FindMatchingFile activity, set the result to StyleCopFiles and the MatchPattern to String.Format("{0}***.cs", StyleCopSettingsFile.Substring(0, StyleCopSettingsFile.LastIndexOf(""))). This will recursively find all the StyleCop settings files in the project and add them to the collection.
-
Inside the sequence add add a StyleCop activity with the following properties (these are a minimum to get it working, to see what the other options do we would suggest you look at the unit tests in the Codeplex activities source.)
- SettingsFile = StyleCopSettingsFile
- SourceFiles = StyleCopFiles.ToArray()
- Succeeded = StyleCopResults
- TreatViolationsErrorASWarnings = True - setting this is down to how you want violations to appear in the log
- ViolationCount = StyleCopViolations
- Inside the sequence add add another WriteBuildMessage activity, again set the importance to High and the Message to String.Format("StyleCop Successed:{0} with {1} violations", StyleCopResults, StyleCopViolations)
- Save the edited process template and check it into TFS
If you have not done so already create a build using this process template. It is worth remembering here that you do not need to do any previous steps on a development PC as long as you DO NOT wish to edit the process template on that PC. You can create a new build that uses your template with custom activity on any PC.
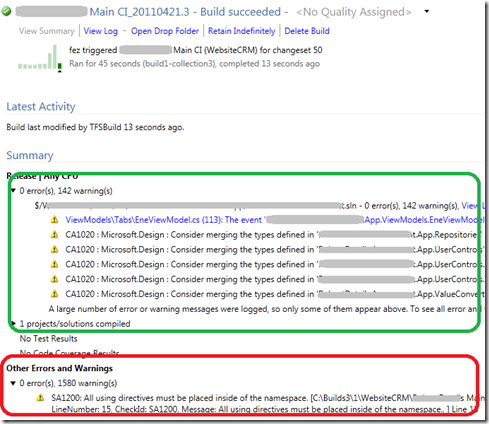
So create a new build using the edited template. Run the build and if it is all OK you should see a build log similar to the graphic below. The actual output will depend on the method used above.

Notice that the FXCop (code analysis) results appear within the main build summary (green), but the StyleCop violations (red) appear in the Other Errors and Warnings section. Unfortunate this cannot be altered. You cannot add extra bits to the main build summary. However, you could choose to fail the build if there are StyleCop violations